Hay Bale Blind-Lessons Learned

Gravel Road

Well-Known Member
I've been wanting to build a hay bale blind for quite a while, and thought it would be a good first project in my new shop. There were plenty of things I would NOT do again, so thought I'd share. Hopefully, you find it useful.
A couple treated 8ft 2x4's were purchased and cut in half. A few 2x6 scraps were cut at an angle and deck screwed in the corners for a little strength. I had a couple old hog panels laying around, so those were utilized as the outside of the blind. They started out at 16.5x4.5 feet. Three squares were cut off the length (about 2 feet) to get the size about right (eyeballed). A 14 ft panel should work great.

The hog panel was bent into shape and wired temporarily to the frame. The hog panel was then attached with some large fence staples. This worked okay, but not great. Adel clamps would be better or maybe some small electrical conduit clamps? Just the wire would probably be enough.
IMG_20170824_190615461 - Copy.jpg IMG_20170824_190609969 - Copy.jpg
 
Since I had an extra scrap panel I decided to use this as the blind ends. This was the biggest mistake of the entire build. The wire gives you nothing to staple to and makes the door difficult to build. Anyway, the ends were welded up and windows cut out.
IMG_20170827_133043622 - Copy.jpg IMG_20170827_181819928 - Copy.jpg
 
Since the shop wiring was done in 1/2" EMT and there were some scraps laying around, I bent some into the shape of a door. his worked okay, but once again, not as well as wood. At this point I was really wishing I'd went with 1/2" plywood for the ends. Unfortunately, there were no pictures, but I ended up cutting scrap plywood and wiring it to the end pieces around the door and windows. This gave me a place to staple the tarp. Originally, I went with the panel ends thinking it would save weight, but with the plywood pieces added the weight ended up about the same.IMG_20170827_181830237 - Copy.jpg
Two layers of tape was put over the end edges to reduce the sharp edges and increase the tarp life.IMG_20170827_182402152 - Copy.jpg
 
The most expensive part of the build was a Harbor Freight tarp, and it was under $20. With plywood ends you could buy a much smaller one since the ends would not have to be wrapped. Here is the temp wrap held in place with a little tape before the stapling began. I don't have photos, but a brad nailer with the U shaped nails was used to staple the tarp into position.
IMG_20170827_184216746 - Copy.jpg IMG_20170827_190938239 - Copy.jpg
 
What a mess the hay part is! I ended up putting the forks on the tractor and lifting off as much of the outer wrap of hay as possible. Once this was in place, chicken wire was put over the hay. The chicken wire was loosely in place with one end wrapped around a scrap piece of 2" wide plywood and screwed to the 2x4 along the bottom. I stuffed handfuls of hay into the voids then pulled the wire tight and screwed it to the bottom 2x4 with more scrap lengths of plywood. Then the ends were covered the same way with misc wire and wood. Sorry for the lack of pictures, but this was done on an extremely hot day by myself, and I got pretty dehydrated before it was done. Totally forgot to take any pics.IMG_20170923_091840490_HDR - Copy.jpg
IMG_20170923_094329682 - Copy.jpg
 
The bale was placed into position next to another old bale, thinking it might be a bit of camo :cool: 
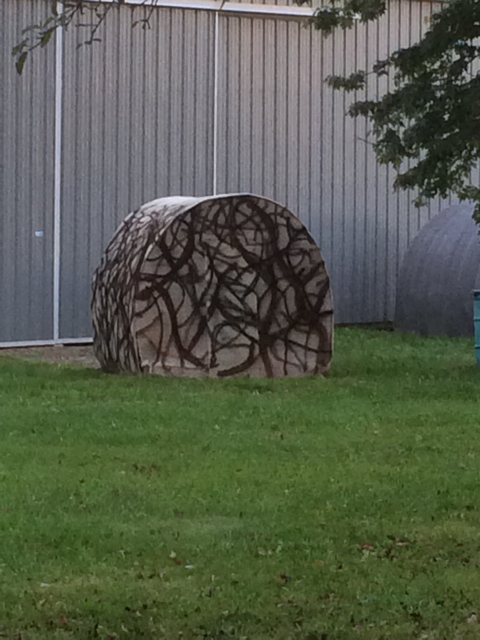
A black square was painted on it to make them look the same. An attempt to reuse the old bale wrap was pretty much a disaster. It immediately gets caught in the chicken wire and turns into a mess. Wouldn't bother with it next time.IMG_20171013_131355137 - Copy.jpg
IMG_20171013_131540459 - Copy.jpg
 
Due to the way the door was built, I thought it would be best to just use bungy cord to hold the door closed. I also just wedge a stick against it in case of heavy winds. The door side is pretty well sheltered though, so not a big deal.IMG_20171013_131410398 - Copy.jpg IMG_20171013_131439286 - Copy.jpg
 
Last edited:
The size is not equal, but the bales were getting old and out of round. Oh well, they were free! It really does look better in person than in the pics.

IMG_20171013_131534479 - Copy.jpg IMG_20171008_131628218 - Copy.jpg
 
Bottom line: use plywood for the ends! It will be so much easier to cut windows and doors. Plus you will have much better stapling ability. If you have access to some of the fabric used to stop construction soil erosion, that should be much easier to use than real hay and lighter weight too. I spent 4-6 hours just messing with the hay and chicken wire.
 
I built 5. I used 1"x1" square tubing and welded into the base, I believe it was 6'x5'. I used a whole 16' panel, and arched it, then welded to the 1"x1" rectangular base. I didn't use any wood. I also used panel for the ends, spot welded to the "arch" panel. I cut the door out, using a piece of panel for the door. I used hose clamps as "hinges." I then used a layer of plastic and covered it with the erosion blanket with straw woven in it. It was great for about a year, then the erosion blanket degrades and falls apart, as designed. I wouldn't do anything different, other than covering it with hay like you, burlap, or something else. I also made sliding window covers using clothes line cable and pieces of black plastic.
 
I built 5. I used 1"x1" square tubing and welded into the base, I believe it was 6'x5'. I used a whole 16' panel, and arched it, then welded to the 1"x1" rectangular base. I didn't use any wood. I also used panel for the ends, spot welded to the "arch" panel. I cut the door out, using a piece of panel for the door. I used hose clamps as "hinges." I then used a layer of plastic and covered it with the erosion blanket with straw woven in it. It was great for about a year, then the erosion blanket degrades and falls apart, as designed. I wouldn't do anything different, other than covering it with hay like you, burlap, or something else. I also made sliding window covers using clothes line cable and pieces of black plastic.

Thanks for sharing. The 1x1 tubing on the bottom would be a little lighter than wood. Can I ask how you secured the plastic without wood? Did you tuck it under the frame and tape it into place? Interesting that the erosion blanket only lasts a year. It would be nice to get more longevity. The burlap sounds like it would be a great option.
My windows are plywood cut to fit the opening and just zip tied to the panel on the top edge. They just flip up and get held in place with a piece of wire. A piece of foam pipe insulation covers the bottom panel edge to keep things quiet.
 
By the way, the windows are way too small for bow hunting. There's just not enough room to move laterally. Maybe if a deer stops broadside in just the right place it would work, but that's pretty iffy. The next version will have another piece or two of the panel cut out to make the window wider. Gun is no problem.
 
Is there enough head room to draw your bow while seated in the chair? I just got my panels today. More than likely wont get it built this fall as I had hoped but I am one step closer than I was last year at this time. LOL

I think your build looks good. I have thought about using the loose hay between two layers of mesh. The erosion control matt I got is way too thin, it would take a minimum of a couple of layers to be worth a crap.
 
I used a layer of plastic that is very tough under the erosion blanket. It was from a local grain elevator, they pile a million or two bushels of corn on the ground and cover it with this material. It's nice because it's white on one side, black on the other. It also has a thread mesh built into it for toughness. We secured the plastic and erosion blanket with about a million zipties. They are holding fine.

With a whole panel, I can sit or stand and draw my bow, and I'm 6'3.

Having access to that grain cover material would be awesome. It must be pretty strong considering the size of the piles. All sorts of things to do with that stuff.

I have not tried drawing a bow inside mine, but I think it would work fine with a larger window. I can't pull a bow anymore, so have to use a crossbow. Sorry if I confused anyone.
 
Thanks for sharing all those pictures, they made your project an interesting read. Plywood ends would definitely be easier. Rubber roofing scraps make a great wrap around the roll if you can get your hands on any. You can glue rubber strips to that stuff to help hold the hay on. Rubber roofing scraps are very useful for about any type of hunting blind.
 
47d634d57f11b44c558763b51cec50da.jpg

Here’s what I ended up with- cut the panels down to 15’, made a 2X6 frame, with 1X6 cross braces on the ends. Covered with an old pool cover, and before I could decide what outer wrapping to use, my sister asked if I could help remove her living room carpet. Added a custom ASAT paint job and towed it into place yesterday. Since it really doesn’t look like hay, I’m going to brush it in later.


Sent from my iPhone using Deer Hunter Forum
 
That's a slick paint job! On another forum a guy hand painted his ends in a circular pattern. It really looked like a silage bale.
 
Back
Top